How should an RV solar system enter the roof?
6 min read
Through one sealed penetration, not one per panel. Combine the array's leads on the roof before they go through, use a proper roof gland or entry box bedded to the roof material, and arrange the cable so water runs away from the hole rather than into it. The entry is the part of a solar system most likely to let water in, and it is the part most often done in a hurry.
One hole is better than six
Each panel arrives with its own leads, and the tempting move is to drop each pair straight through the roof where it happens to sit. That turns one weatherproofing problem into six. The alternative is to join the array's leads on the roof and bring a single cable through: fewer holes, fewer seals, and one place to inspect.
Joining on the roof does mean connectors sitting outside, exposed to weather. That is normal in solar work, but it shifts the maintenance question: the junction becomes something to check, not something to forget.
The entry itself
- A gland or entry box designed for a cable, not a hole filled with sealant.
- Bedded to the roof material with a sealant that suits it, not one that suits a different plastic.
- Positioned where water will not pool, and away from the lowest point of a roof that holds water.
- Accessible, because a seal that cannot be inspected will not be.
The failure mode is rarely the gland. It is the interface between the gland and the roof: a sealant that did not adhere, a surface that was not clean, or a fixing that worked loose as the shell flexed. That is why the entry wants to be somewhere you can reach.
The drip loop
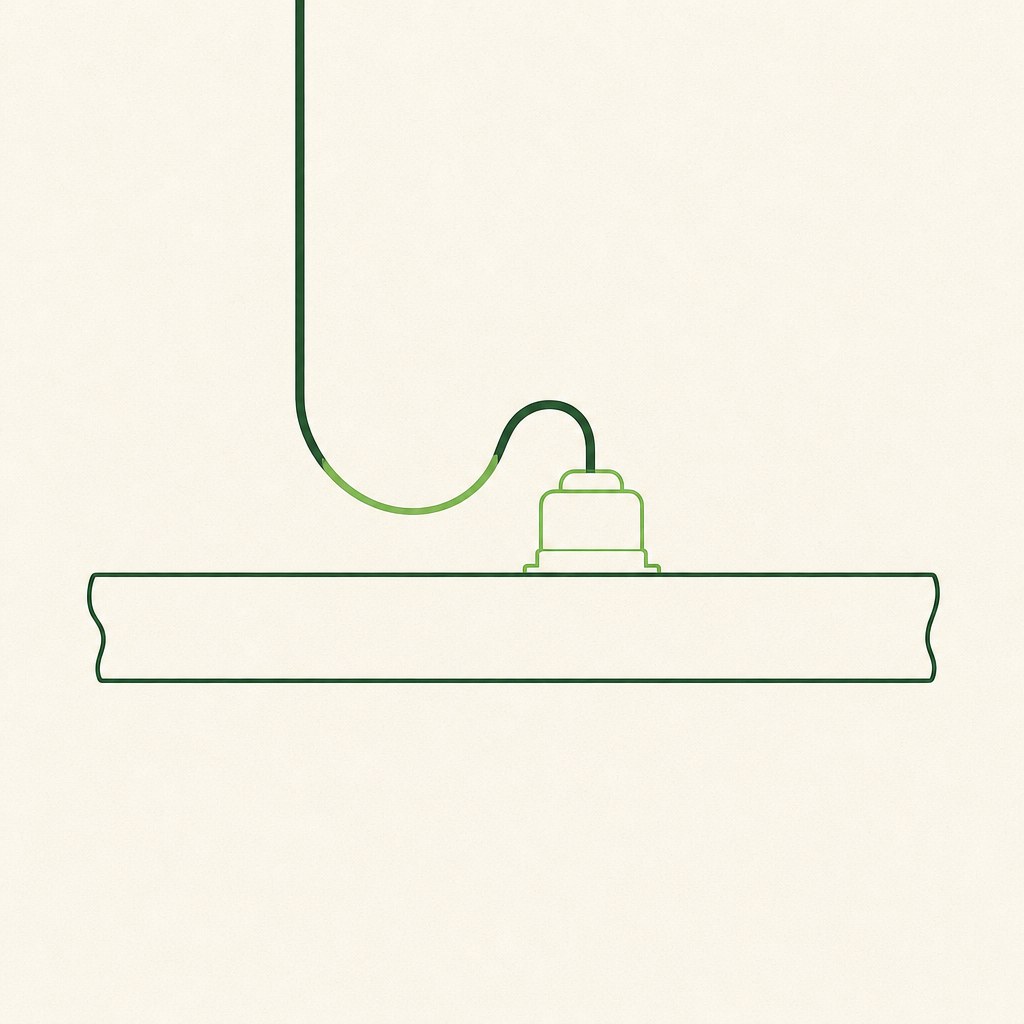
The cable should dip below the entry point before rising into the gland, so that water running down the cable drips off at the bottom of the dip instead of tracking into the hole. It costs nothing, takes no parts, and is the single most effective detail in a roof entry.
Strain relief and abrasion
The cable has to be supported so its weight and the movement of the vehicle do not pull on the entry or on the panel's own leads. It also has to be kept off any edge that can saw through insulation over thousands of kilometres of vibration. A cable that looks neat on the day it is fitted can be the fault you spend a weekend finding two years later.
What we do not publish
We do not publish a specific gland, a sealant specification, or a roof-entry kit, and our panel data does not include a cable length or a connector type for the entry. The panel's own electrical figures are published; the weatherproofing of the hole is a matter for the roof, not for the panel.
Frequently asked questions
- Can I run a separate cable through the roof for each panel?
- You can, but each one is another seal to maintain and another chance for water. Combining the leads on the roof and bringing one cable down is the usual practice for that reason.
- What is a drip loop and do I need one?
- A dip in the cable below the entry point so water runs off before it reaches the gland. It needs no parts and it is the cheapest protection against the most common roof-entry leak.
- Where is the best place to put the roof entry?
- Somewhere water will not collect, the seal can be inspected later, and the cable can reach the controller without pulling on the entry. Avoiding the lowest point of the roof matters more than a tidy cable run.
- Does the roof entry affect how much power the system makes?
- Only if it fails. A wet connector or a corroded joint shows up as a fall in yield rather than as an obvious fault, which is another reason the entry is worth doing once and properly.